Smart Clicker
December 20, 2013Cost: Less than $10
Time Needed: Less than 1 hour
Skill Level: Intermediate
Functional Abilities/Limitations: Difficulty in Handling and Fingering, Difficulty Reaching with Arms, Inability to Use Lower Extremities
About
Welcome to SmartClicker! SmartClicker is a virtual mouse software, which means that it can perform all of the standard operations that a user could perform with a mouse, but without the need to click or use a mouse. SmartClicker was originally designed as a software package to operate with head-tracking devices, but it can readily be used as a substitute by any users who wish to minimize the amount of clicking they would like to perform when using their computers, such as those with limited mobility in the fingers or wrists or those who lack fine control in their hands.
SmartClicker operates by generating a mouse click or performing a specific mouse action when a user has hovered their mouse cursor over a specific location for a pre-determined period of time. There are several commercially available virtual mouse products after which this open-source software package is modeled, such as “Point-N-Click” and “Dwell-Clicker.” SmartClicker, however, goes beyond the standard functionality of these products to offer intelligent, context-based clicking functionality that accomplishes more complex actions, such as clicking and dragging, resizing windows, or moving task bars, with very few steps of action. This documentation will go on to explain the existing features and their mechanism of operation in greater detail.
SmartClicker is a Windows C# application that is designed to run on Windows 7. In its current form, it may not operate on Windows XP or Windows 8. To see how we developed smart clicker, and how it works under the hood, please go to our github repository.
Relevant Links
Step 1: Getting Started
1. A beta release of the application can be found on the SmartClicker github repository, at https://github.com/foxmadnes/SmartClicker. Download the project source, compile, and run.
2. When the application is run for the very time, launch it using the desktop icon. From this point forward, you can configure the application to run automatically on startup. See customization form documentation below.
Step 2: Main Form
1. About the main page:
a. When the application is launched, you will see the following user interface.
This form is the base for the application, and allows the user to select which click mode they want to be in. From the top to the bottom, the options include Sleep Mode, Context Mode, Left Click, Right Click, Double Click, Click and Drag, Settings, and Help.
b. To select a mode, hover your mouse cursor over the respective button. The background of the icon will initially turn yellow to demonstrate where the cursor is currently located, and upon remaining over a specific icon, it will turn red to indicate that this mode will be used for one click. If you continue to remain over the icon, the background will turn gray to indicate that you are locked in this mode until you specifically switch to another mode, meaning that all clicks will default to this mode.

Step 3: Mode Details
a. Sleep mode- if this mode is selected, the cursor will not generate any clicks in any location. This should be used when you want the clicking functionality to be inactive. This could be while you read a book or watch an on-screen movie. Don’t worry! The fetcher icon will always be shown on top of other applications so that you can reselect a different mode once ready.
b. Context mode- the base operation for this mode is a left click. However, if the cursor lands upon an “interesting” feature, it will perform an additional, more complex operation. For example:
i. Putting the cursor over a window corner or frame divide will automatically perform a click and drag operation, allowing you to resize
ii. Putting the cursor over a Windows title bar will automatically perform a click and drag operation, allowing you to move the window around the screen
iii. Putting the cursor on a Windows scroll bar will automatically perform a click and drag operation, allowing you to scroll through the window
c. Left click – the cursor will generate a left click in this mode.
d. Right click- the cursor will generate a right click in this mode.
e. Double click- the cursor will generate a double click in this mode.
f. Click and drag- the cursor will click down on the first dwell, and click up on the second, allowing you to perform the action calmly.
g. Settings- Launch the customization form. See the next section for details
h. Help- Launch the help window
Step 4: Customization and Setting Form
About the Customization Form:
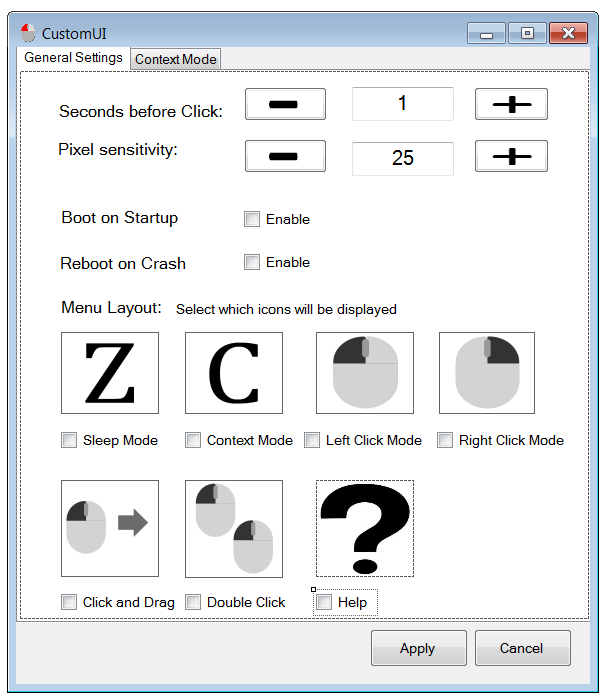
The customization button opens up the customization form, which allows you to change various settings within the program. There are two tabs to choose between: General Settings and Context Mode.
General Settings:
-Seconds before click- allows you to change the amount of time the program waits before performing a click function.
-Pixel Sensitivity- allows you to change the area (in pixels) of the space you need to keep your cursor in order to perform a click.
-Boot on Startup- allows you to choose whether you would like the program to automatically open when you turn on your computer.
-Reboot on Crash- allows you to choose whether you would like the program to automatically reopen if it ever unexpectedly crashes.
-Finally, you can select which buttons you want to show in the main form by either selecting or unselecting their checkboxes.
-The Context Mode tab allows you to select or deselect situations where the program will automatically perform the click and drag function in context mode.

Aids for Daily Living, Computers, Controls
Tags:
computer mouse usehead trackingmousemouse supportvirtual mouse
Tools Required
- Computer running Windows 7
Materials Required
- Computer running Windows 7
Safety Precautions
There are some current known bugs, so running a different application in the background is suggested at this time.